How to take on the tier 0 pinnacle boss fights in Project Diablo 2: Vision of Terror (Diablo Clone), Voidstone (Rathma) and Shadow of Hatred (Lucion). Each tab covers getting in, the fight's mechanics, what kills players, defenses, strategy, recent changes and rewards.
This guide is still being written and checked. It was compiled from the PD2 wiki and patch notes up to Season 13, and some details may be incomplete or out of date. Season 14 changes will be added once they are announced.
What tier 0 means
Vision of Terror, Voidstone and Shadow of Hatred each have three difficulty tiers: 0, 1 and 2. Transmute the item alone in the Horadric Cube to cycle its tier.
Tier 0 is the base fight. The wiki notes that tier 1 is roughly as hard as these fights were before tiers existed, so T0 is easier than the old fights.
Since Season 12, a T0 fight gives you three portals instead of one. Re-entering heals the boss by 20%, but phases you already cleared do not happen again, and you get a short invulnerability on entry.
T0 keeps the main reward: Annihilus from Vision of Terror, a Tainted Worldstone Shard from Voidstone, or a desecration from Shadow of Hatred. A desecration succeeds less often at T0: 50%, against 60% at T1 and T2. The exclusive uniques and other T1/T2-only drops need tier 1 or 2.
A three-phase fight against a much tougher Diablo. You have to stay close to him, dodge meteors and burning ground, clear skeleton waves, and survive a wave of big cold novas between phases.
A closed arena. At T0 you get three portals: going back in heals Diablo Clone by 20%, but skeleton and nova phases you completed stay completed, and you get a few seconds of invulnerability to grab your body.
Your mercenary does not come with you, and most buffs are removed: recast Battle Orders, summon spirits, recast your other buffs and shapeshift after you enter.
Trapped Souls around the arena throw meteors and Bone Spirits for the whole fight.
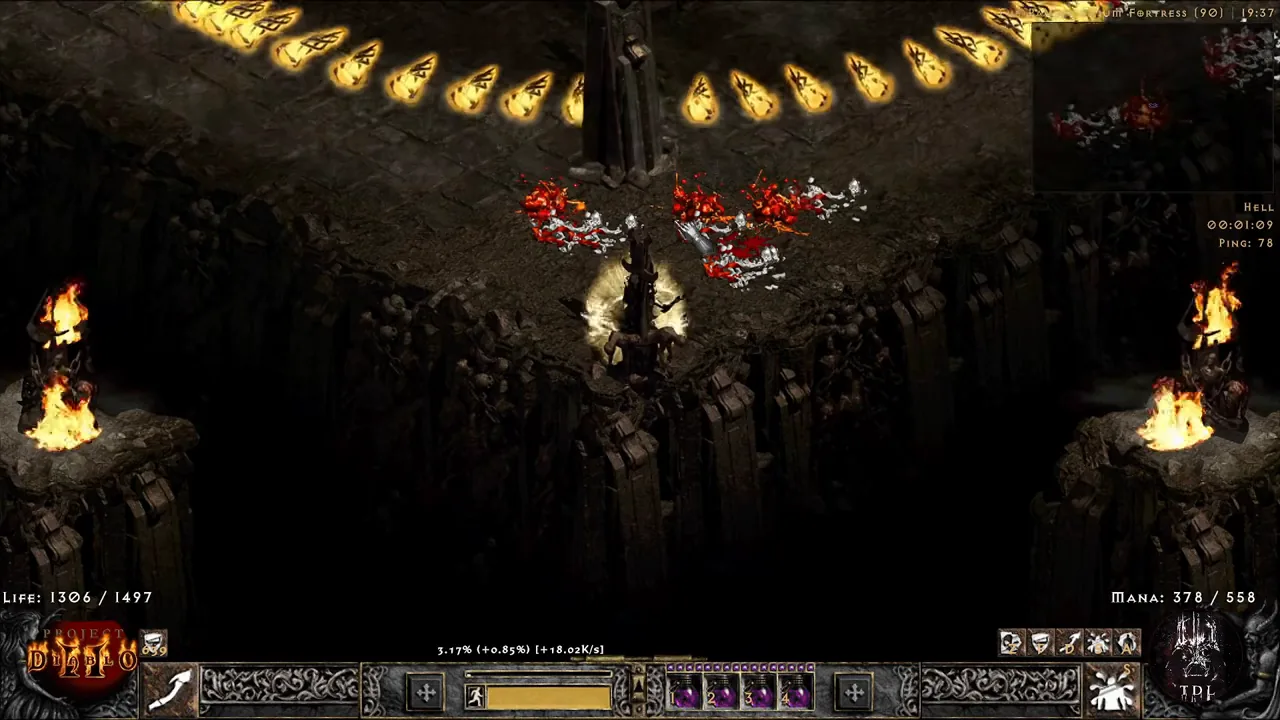
Pillars around the arena block the novas. Hiding behind one during a nova wave is how you stay safe (see the second image).
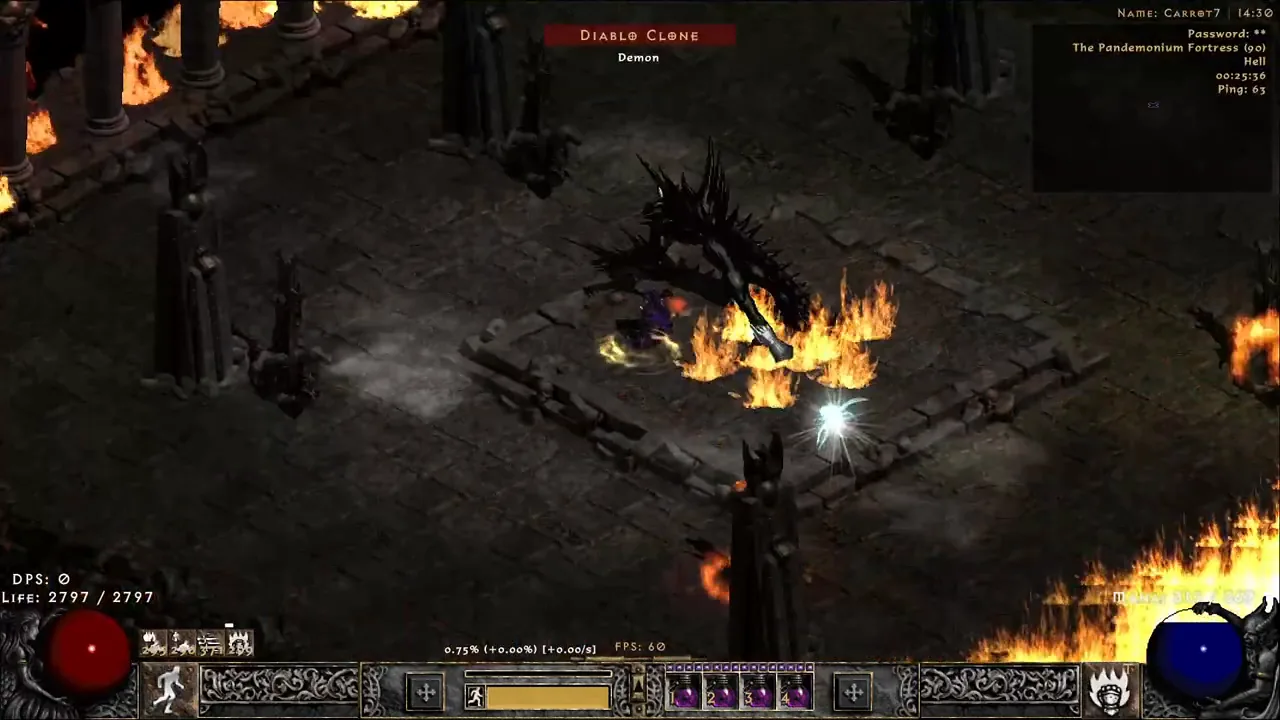
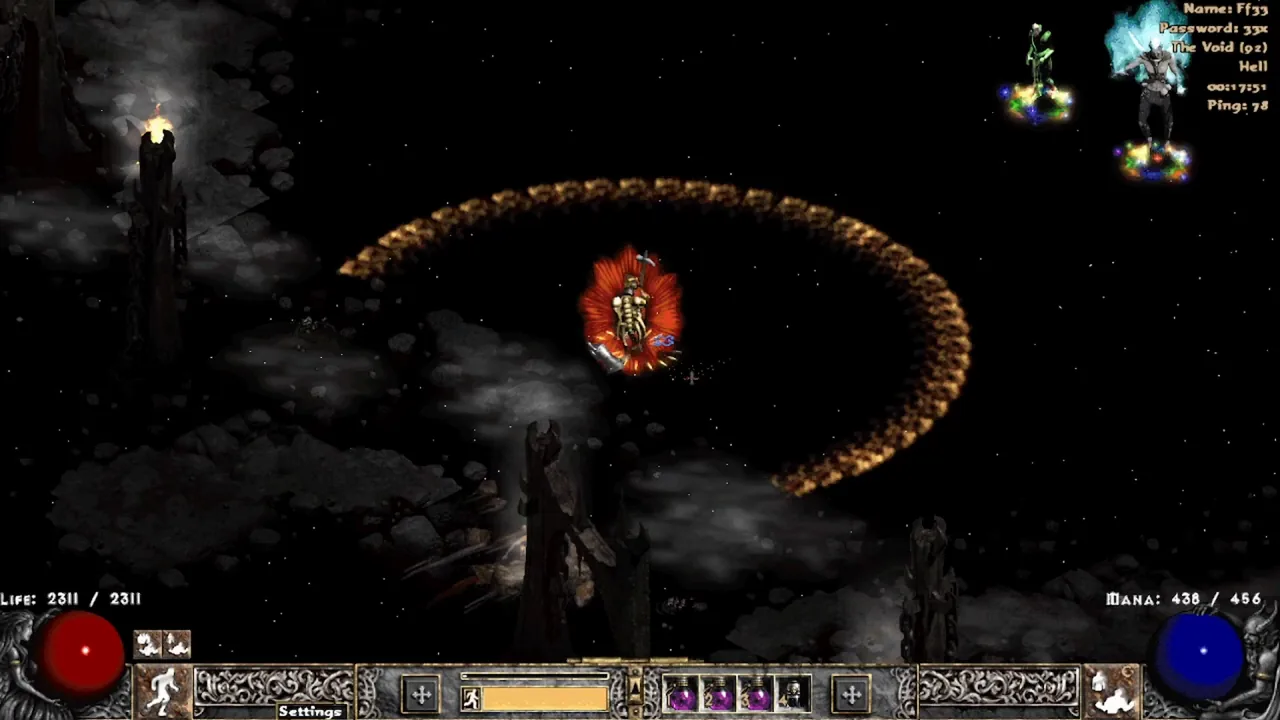
The Pandemonium Fortress. The raised square in the middle is where Diablo Clone runs before the cold novas between phases (he can stop off-center if something blocks him). The dark hooded statues around the edge appear to be the Trapped Souls that throw meteors and Bone Spirits.Image: Carrotizer (YouTube)Hiding from a nova wave. Diablo Clone is off-screen in the middle of the arena, beyond the pillar at the top. The arc of novas spreading out from him has a gap right where the pillar stands, and the player waits in that shadow, in the corner behind the pillar, until the wave has passed.Image: TDL Plays Games (YouTube)
Getting in
Cube a Prime Evil Soul, a Black Soulstone and a Pure Demonic Essence into a Vision of Terror.
Prime Evil Soul: drops from Mephisto, Diablo and Baal in Hell.
Black Soulstone: drops from Uber Tristram together with the Hellfire Torch.
Pure Demonic Essence: drops from map bosses.
Before you open it, check all your gear and your character screen: the right items equipped, resistances, life and skills where you expect them. Mistakes are much more expensive inside the arena.
Leave the Vision on tier 0 (cube it alone to cycle tiers), then use it next to the fountain in Harrogath (Act 5, Hell). The portal opens for everyone nearby. Only one boss area or map can be opened per game.
Skills, phases and mechanics
Diablo Clone is immune to all damage if no player is within about 10 yards of him. Ranged builds still have to stand close.
The fight has three phases. After enough damage he becomes immune and summons skeletons; kill them to resume the fight. The first wave is melee skeletons, the second adds archers, and the third adds mages (including cold mages). Skeletons cannot be cursed, but a Barbarian's Taunt works on them.
Between phases he becomes immune, runs toward the middle of the arena and casts a wave of cold novas. He runs rather than teleports, and his run is your cue to get behind a pillar. If he is blocked on the way he can end up off-center, so watch where he actually stops.
After the third skeleton wave and the last nova wave there are no more immunity phases: commit and finish him.
Season 12 almost completely removed the invisible fires and double phasing with poison and open wounds damage, but you can still double phase.
He has 1,579,500 life, a 15% block chance, 20% magic resistance, 30% physical, fire, cold, lightning and poison resistance, 95% curse resistance, 75% poison length reduction and 8% fire absorb. He is a demon, so damage to demons works on him.
What kills players
The cold novas between phases when you are not behind a pillar. Most deaths happen here.
Desync during a nova phase: the game shows you behind a pillar when the server has you somewhere else. Get in the habit of resyncing every time you move into a safe spot during the novas.
The fire corner: burning through too many rejuvenation potions, or trying to readjust your position and making a mistake.
His melee attack carries cold damage and freezes you, and the last skeleton wave brings cold mages.
Meteors and burning ground while you are busy with a skeleton wave.
Wandering more than about 10 yards from him: he stops taking damage and the meteors keep falling.
Resistances and defenses
A decent life pool: 1,500 to 2,000 life, more is better. Put flat life in sockets where you can.
A good faster hit recovery breakpoint, ideally the one before the fastest you can reach. You will get hit.
25 to 30% physical damage reduction for Diablo Clone, the skeletons and the meteors.
At least 80% maximum fire resistance, 85% to be comfortable. You do not need 90% at T0.
Cannot Be Frozen, from boots, a ring or a corruption.
Keep your other resistances capped for the skeleton mages.
Fill your belt with full rejuvenation potions.
Strategy and positioning
Practice first in single player: host a TCP/IP game (Other Multiplayer, TCP/IP, Host Game), which behaves closer to online play than plain single player.
After you enter, recast your buffs, then stay close to Diablo Clone the whole time so he can take damage.
Keep moving. Don't let meteors or Bone Spirits land on you, and step out of burning ground right away.
Kill each skeleton wave quickly, archers and mages first.
Getting ready for a nova wave: as soon as he goes immune and starts running, move to a corner and put a pillar between you and him. Top up life and mana on the way, make sure your belt is full of full rejuvenation potions, and resync once you are in place. Stay put until the wave is over, then move back in.
If you die at T0, go back in through one of the extra portals and grab your body during the short invulnerability. The boss heals 20%, but completed phases stay completed.
T0 does not prepare you for T1, and T1 does not prepare you for T2: the higher tiers need more practice and better gear.
Changes that made it easier
Season 12: T0 gets three portals and entry invulnerability (with more boss life to compensate). Invisible fires and double phasing with poison and open wounds were almost completely fixed, and the Trapped Souls pull less aggro.
Season 13: no changes to T0.
Rewards and drops
Annihilus, a unique small charm: +1 to all skills, +10-20 to all attributes, +10-20 all resistances, +5-10% experience gained.
Tiers 1 and 2 add a 1/200 chance for an exclusive unique: Overlord's Helm, Dark Abyss, Itherael's Path, Hadriel's Hand or Aidan's Scar. T0 does not have this chance.
A long fight with three pre-phases of undead waves, each followed by a boss phase: Mendeln alone, then Rathma alone, then both together. Almost every damage type is used against you except lightning.
The fight moves through three void-themed areas: the Decaying Swamplands, the Ruins of Necropolis and The Void.
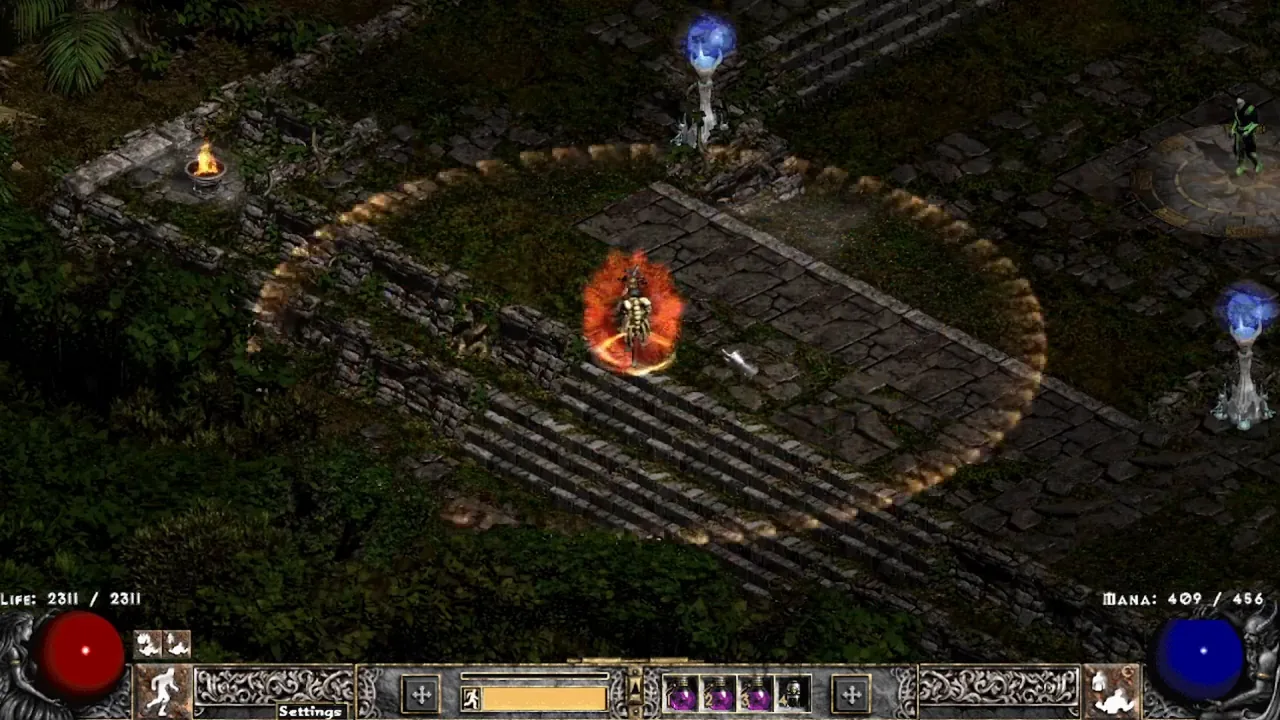
Mendeln's arena has four Ancient Spires that fire glacial spikes for heavy cold damage. Since Season 11 they cannot be targeted.
You cannot freely leave while enemies remain. At T0 you get three portals (see the top of this page).
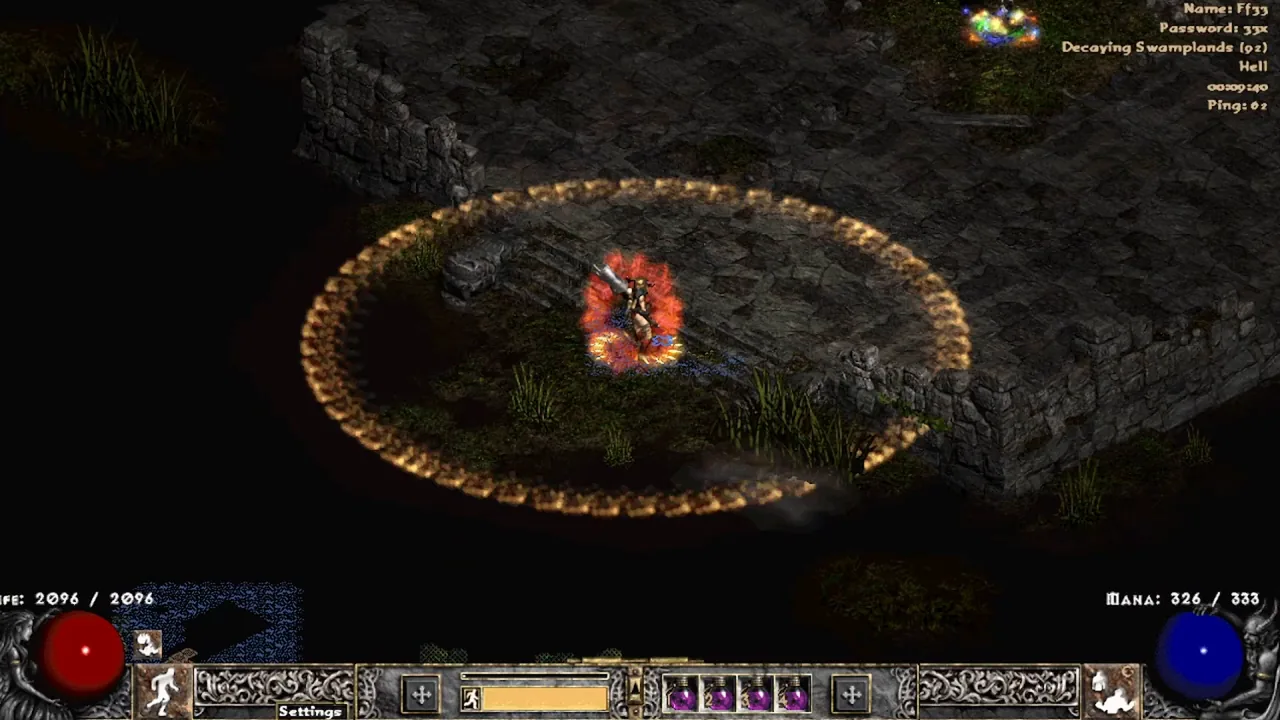
Decaying Swamplands, one of the pre-phase areas: broken stone platforms in dark swamp water.Image: FrankieFresh (YouTube)Mendeln's arena. The pillars with glowing blue orbs (top and right) are Ancient Spires: they fire glacial spikes and cannot be targeted. Mendeln stands on the round platform at the top right.Image: FrankieFresh (YouTube)The Void, Rathma's arena: a dark, open floor of floating rock and mist with tall black spires around it.Image: FrankieFresh (YouTube)
Getting in
Cube Trang-Oul's Jawbone, a Splinter of the Void and Hellfire Ashes (or a Hellfire Torch) into a Voidstone.
Trang-Oul's Jawbone: drops from undead enemies (about 1 in 22,500 in Hell). Undead in the Rathma fight can drop it too.
Splinter of the Void: drops from the Shadow of Mendeln map event ("Evil beckons you from the Void..."). The wiki lists about 40%, unconfirmed.
Hellfire Ashes or Hellfire Torch: from Uber Tristram. Ashes are just a stackable ingredient version of the torch.
Keep the Voidstone on tier 0 and use it at the blood fountain in Harrogath. The item text recommends level 80.
Skills, phases and mechanics
The fight alternates pre-phases and boss phases: pre-phase 1, Mendeln, pre-phase 2, Rathma, pre-phase 3, then Rathma and Mendeln together.
Pre-phases are waves of mostly undead monsters in three different areas. They drop mana, full rejuvenation and antidote potions; the first pre-phase drops far fewer potions. Burning Souls and Void Watchers here are the only lightning damage in the fight.
Mendeln (mostly poison, one cold skill): poison ball that bursts into a small poison nova, sludge nova (instant poison damage), cold wave, and Lower Resist. At T0 his Lower Resist is -25% (-29% at T1, -33% at T2).
Mendeln's events alternate, starting with golems. Blood golems: he teleports to the middle and summons four blood golems that walk to him and heal him if they reach him. Vines: he teleports to the middle, casts poison vines with a poison cloud around the edge of the arena, then ends with a deadly poison nova with a very long poison duration. He is immune until the golems are gone or the nova is cast. In the final phase he does not summon golems.
Rathma (magic damage): a bone spear that leaves a burning trail and hits for a percentage of your life (it cannot be blocked by Weapon Block or Holy Sword or avoided by Evade or Dodge), Teeth, a bone nova that leaves a burning ring at max range, a triple teleport and bone spear combo, and Conjured Souls that cast fissure (fire).
At 70%, 50% and 30% life Rathma summons Void Knights and is immune until all of them are dead: 70% brings 1 cold, 2 fire, 1 poison; 50% brings 1 cold, 1 fire, 2 poison, 1 physical; 30% brings 2 cold, 2 fire, 1 poison, 1 physical. A knight's damage matches the color in its right hand (red fire, blue cold, green poison, purple physical), and knights can curse.
In the final phase the two bosses share life: damage to one also damages the other. Both are immune while Void Knights are up.
Mendeln's poison nova at the end of each vine event, with its very long poison duration.
Rathma's three-in-a-row teleport bone spears. They hit for a share of your life and can't be blocked or dodged.
Burning ground from bone spear trails and the bone nova ring.
Glacial spikes from the Ancient Spires in Mendeln's arena.
Void Knights stacking elemental damage and curses while the bosses keep casting.
Mendeln's Lower Resist cutting your resistances further while all of this happens.
Resistances and defenses
Poison and cold are the big ones: go well above 75% (max resist) and add poison length reduction to shorten the long poison.
Overcap all resistances to offset Mendeln's -25% Lower Resist at T0.
Keep fire capped for the fissures, burning trails and fire Void Knights.
Lightning is the one element that barely matters here.
Stock antidote and rejuvenation potions early; the first pre-phase drops very few.
Strategy and positioning
Use the pre-phases to refill potions and belt before each boss phase.
Against Mendeln, kill the blood golems before they reach him, or they heal him. During vines, stay away from the arena edge and get clear before the final poison nova.
Against Rathma, keep moving so the teleport bone spears and burning trails don't pin you. Kill Void Knights fast; he is immune until they are dead.
Deal with knight colors that threaten you first (for example the physical knight for low-PDR builds, poison knights for low poison resistance).
In the final phase, damage either boss. Their life is linked, so spread damage however is easiest.
At T0 you can re-enter through an extra portal after a death. The boss heals 20%, but cleared phases stay cleared.
Changes that made it easier
Season 10: Splinter of the Void drop rate from the Shadow of Mendeln event doubled. The level 80 entry requirement was removed.
Season 11: Rathma and Mendeln magic resistance cut from 35% to 25%, Conjured Soul magic resistance from 50% to 40%, and Mendeln's phase 1 towers made untargetable. A bug that halved phase 1 Mendeln's lightning resistance was fixed.
Season 12: T0 gets three portals and entry invulnerability (with more boss life to compensate). Later waves had too few monsters and now spawn as intended, and fissure skeletons no longer spawn outside the arena.
Season 13: tier 2 got easier (less minion life, lower resistances, less Rathma teeth and ground fire damage), and T2 drop rates now match T1. These changes are listed under tier 2.
Rewards and drops
A Tainted Worldstone Shard, used to corrupt Annihilus. Each of +1 to all skills, +20-25 Vitality and +10-15 Energy, +5-10 all resistances, or +3-5% experience has a 20% chance; there is also a 20% chance the charm turns into a random magic small charm.
Tiers 1 and 2 add a 1/200 chance for an exclusive unique (The Third Eye, Band of Skulls, Cage of the Unsullied) and small chances for a Horadric Navigator, Horadric Almanac or Skeleton Key. T0 does not have these.
A lightning-heavy fight with portals that spawn minions. Lucion's two-wave lightning nova is the signature mechanic. Killing him opens the Temple of the Triune, where you can desecrate an amulet.
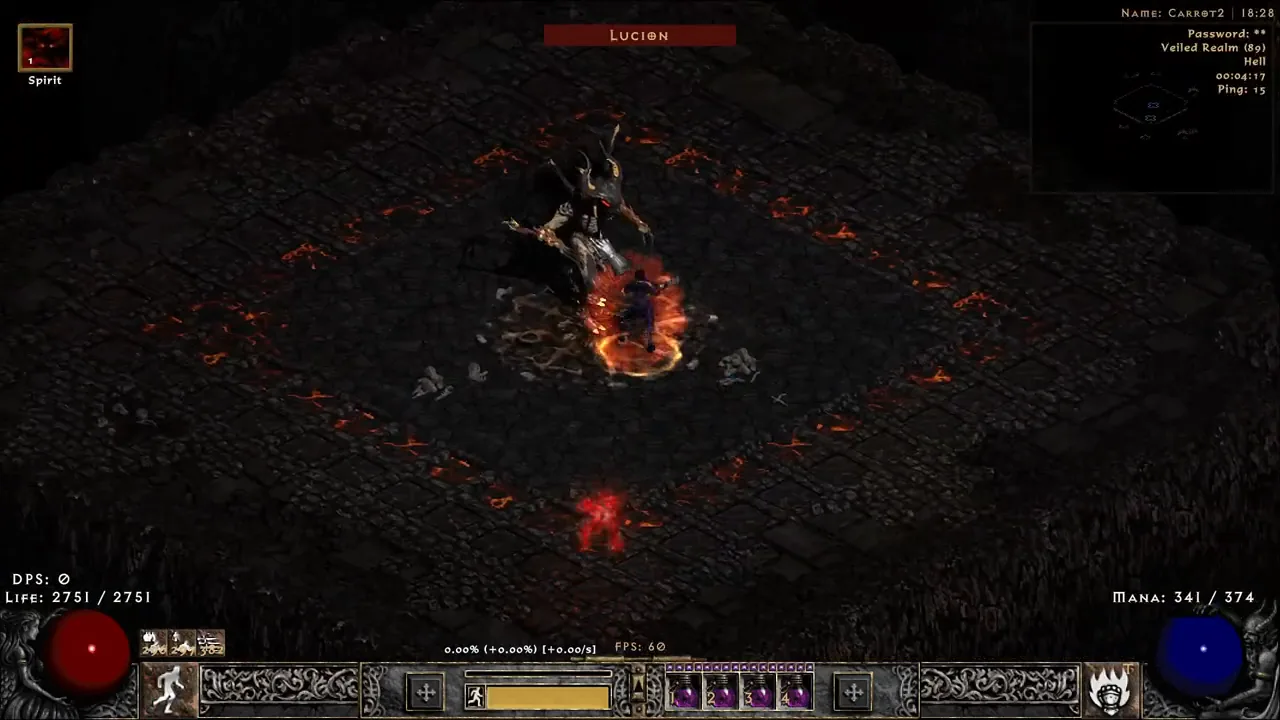
Lucion is fought in the Veiled Realm. At T0 you get three portals: going back in heals him by 20%, completed phases stay completed, and you get a few seconds of invulnerability to grab your body.
Your mercenary does not come with you, and most buffs are removed. Recast them after you enter.
Veiled Portals spawn Lucion's minions during the portal phases.
After the kill, a portal opens to the Temple of the Triune, with the altar where you desecrate your amulet.
The Veiled Realm, Lucion's arena: a square stone platform with lava cracks, floating in darkness. Lucion is at the center with the player.Image: Carrotizer (YouTube)
Getting in
Cube a Demonic Insignia, a Talisman of Transgression and Flesh of Malic into a Shadow of Hatred.
Demonic Insignia: drops from enemies in the Act 5 red portal zones in Hell.
Talisman of Transgression: drops from enemies in corrupted zones.
Flesh of Malic: drops from demon enemies.
Before you open it, check all your gear and your character screen, and have the corrupted amulet you want to desecrate with you.
Keep the Shadow of Hatred on tier 0 and use it next to the fountain in Harrogath (Act 5, Hell).
Skills, phases and mechanics
For the whole fight, lightning snakes across the floor. Red lightning only shows where the lightning will be and does no damage; white lightning does the damage.
After enough damage he teleports to the middle and fires two lightning novas. The first does a little damage and tries to stun you; the second does a lot of damage. The novas have gaps you can see: run into one.
After the novas he disappears and black portals appear. Small demons come out that hit hard and can stun lock you. Kill them and destroy every portal; he comes back, but keep focusing the portals until they are gone.
The second portal phase summons bigger monsters. The third adds floating monsters that can stun you. After the third portal and nova phase you can commit; if he is not dead yet, he keeps repeating portals and novas.
Since Season 12 his attacks ignore two thirds of your block chance.
He has 2,400,000 life, a 15% block chance, 30% resistance to physical, magic, fire, lightning, cold and poison, 95% curse resistance and 50% poison length reduction. He is not a demon, so damage to demons does not work on him, but his minions are demons.
What kills players
The second, big lightning nova when you are not in a gap.
Being stun locked by a pile of small demons, or by the floating monsters in the third portal phase.
Running through white lightning on the floor.
Letting portals stay open so the room fills with minions.
Resistances and defenses
A decent life pool: 1,500 to 2,000 life, more is better.
A good faster hit recovery breakpoint, ideally the one before the fastest you can reach.
At least 30% physical damage reduction. This matters most here.
At least 80% maximum lightning resistance. Lightning is the only elemental damage in the fight.
Cannot Be Frozen is not needed, and fire, cold and poison resistance don't matter here.
Don't rely on block: he ignores two thirds of it.
Strategy and positioning
T0 Lucion is mostly a damage check: survive, dodge the novas and do a lot of damage.
After you enter, recast your buffs.
In each portal phase, kill the minions and close the portals as fast as you can before going back to Lucion. In the third phase kill the floating monsters first.
Watch the floor: step around white lightning and don't worry about red.
When he teleports to the middle, get ready for the two novas and move into a gap before the second one.
If you die, go back in through an extra portal and grab your body during the short invulnerability.
Changes that made it easier
Season 11: tier 0 was added for Lucion.
Season 12: T0 gets three portals and entry invulnerability, and his attacks now ignore two thirds of block.
Season 13: no changes to T0.
Rewards and drops
Access to the Temple of the Triune. Place a corrupted amulet on the altar to desecrate it: it gets a second corruption from the high-rarity amulet pool (+1 all skills, 10% FCR, 10% FRW, 10% curse resistance, 30-40% ED, Cannot Be Frozen, +2% all max resistances, or 7-10 all resistances).
At T0 there is a 50% chance the desecration fails and the amulet turns rare, keeping two random corruption mods. At T1 and T2 the failure chance is 40%.
Golden chests in the temple drop one more item per tier, so T0 chests drop the fewest.
The Demonic Cube only drops from Lucion at tier 1 and 2, not T0.